DIY Home Portrait Studio on a Budget - Part 1
Creating a home portrait studio doesn’t have to break the bank. Whether you’re a beginner photographer or an experienced portrait photographer, you can achieve professional-quality studio photography at home with minimal investment. Here’s how to set up a budget-friendly home studio using natural light photography, DIY backdrops, and affordable lighting solutions.
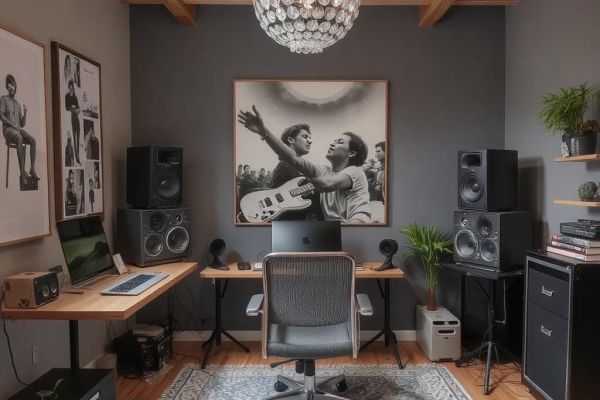
1. Choosing the Best Space for Your Home Studio
Setting up a home portrait studio requires careful planning, and the first step is choosing the perfect space. As renowned photographer, Ansel Adams, once said, "You don't take a photograph, you make it." When selecting a space, consider the availability of natural light, as positioning your setup near a large window can provide soft, professionally-lit portraits. Ensure the space has sufficient room for portrait photography poses and backdrop setup, allowing your subject to sit, stand, or move around comfortably. Additionally, opt for a space with minimal background distractions, such as a plain wall or uncluttered area, to avoid cluttered or busy patterns that can detract from your subject. As Henri Cartier-Bresson, a pioneer of street photography, noted, "Your first 10,000 photographs are your worst." By considering these factors and being mindful of the space, you'll be well on your way to creating a functional and efficient home portrait studio, and taking your photography skills to the next level.
2. DIY and Budget-Friendly Backdrops
Creating a professional-looking backdrop doesn't have to break the bank. As the celebrated photographer, Richard Avedon, once said, "A photographic portrait is a picture of someone who knows he's being photographed." With a little creativity, you can achieve stunning studio portraits without expensive materials. Consider these budget-friendly alternatives: A plain wall can be a great starting point. A simple white, gray, or textured wall can provide a clean and timeless background for your portraits.
As the legendary photographer, Dorothea Lange, noted,
"The camera is an instrument that teaches people how to see without a camera." If you don't have a suitable wall, don't worry – you can easily create a makeshift backdrop using household items.
Bedsheets or curtains can be repurposed as a seamless background. Simply hang a solid-colored sheet or curtain behind your subject, and you'll be amazed at how effective it can be. For added texture and interest, consider using a wrinkled fabric or a vintage sheet with a unique pattern. If you're feeling crafty, why not try your hand at some DIY backdrop ideas? Large paper rolls can provide a smooth, uniform background, while a painted canvas can add a creative and artistic touch. As the iconic photographer, Cindy Sherman, said, "I think I've always been interested in exploring the relationship between the self and the other." You can also experiment with different fabrics, textures, and colors to create a unique and personalized backdrop that reflects your style.
3. Affordable Lighting Options
Proper lighting is the backbone of portrait photography, and it's essential to get it right to capture stunning images. As the renowned photographer, Joe McNally, once said, "Light is everything in photography." If you can't afford professional studio lights, don't worry – there are plenty of affordable alternatives to achieve beautiful, well-lit portraits. First and foremost, natural light is the cheapest and most effective light source available. Position your subject near a window, and use sheer curtains to diffuse harsh sunlight and create a soft, warm glow. This is especially effective during the golden hour, just before sunset, when the light is soft and golden.
If natural light isn't an option, consider creating your own DIY reflectors using white foam boards or aluminum foil-covered cardboard. These can be used to bounce light onto your subject, adding depth and dimension to your portraits.
For continuous lighting, there are several budget-friendly options available. LED ring lights, for example, provide soft, even lighting that's perfect for capturing portraits. Clip-on desk lamps with daylight bulbs can be used for directional lighting, adding a touch of drama and depth to your images.
Finally, consider creating your own DIY softboxes using lampshades and white cloth. These can be used to create diffused, soft light that's perfect for capturing portraits. As the celebrated photographer, Annie Leibovitz, once said, "The camera is a remarkable instrument, but it's not a magic wand." With a little creativity and experimentation, you can achieve professional-looking results without breaking the bank.
Creating a home portrait studio on a budget is achievable with the right approach using natural light, DIY backdrops, affordable lighting solutions, and smart equipment hacks. The first step is selecting an ideal space with ample natural light, preferably near a large window, to provide soft, professional-looking illumination. A clutter-free background enhances the focus on the subject, ensuring a clean and polished look. For backdrops, simple options like plain walls, bedsheets, curtains, or DIY-painted canvases can create a studio-like setting without high costs. Lighting is key, and natural light remains the most cost-effective option. To enhance it, DIY reflectors using white foam boards or aluminum foil can help bounce light effectively. Affordable alternatives like LED ring lights, clip-on desk lamps with daylight bulbs, or DIY softboxes using lampshades and white cloth can also provide professional-quality lighting.
In Part 2, We Will Delve Into…
Now that your home studio setup is in place, the next step is bringing your portraits to life with essential camera hacks, creative posing techniques, and budget-friendly editing tools. In Part 2, we will explore how to maximize your equipment—whether using a smartphone or DSLR—create DIY light stands, and use simple props to add depth to your shots. We’ll also cover free editing apps like Snapseed and Lightroom Mobile to enhance your images, along with expert tips on posing, lighting tricks, and final touches that make a portrait stand out. With these practical techniques, you’ll be able to achieve stunning, professional-quality portraits right from your home—without breaking the bank!